Super Finish
How to achieve an isotropic finish using a traditional vibratory bowl—and why you’d want to do it
Bearings, gears and other engineered components transmit energy and/or motion by rolling, sliding, rotating or engaging their complementary partners. Areas of metal-to-metal contact between components are of great engineering concern, because such contact points increase frictional resistance, resulting in premature wear and reduced efficiency.
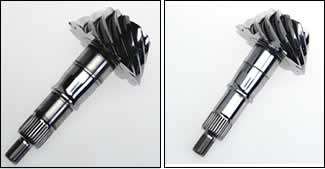
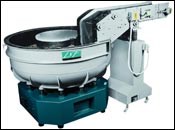
Vibratory bowls are commonly used in metal finishing for generic deburring. But by using non-abrasive, high-density media in conjunction with an isotropic superfinishing chemistry, vibratory bowl finishing can be used to superfinish the surfaces of complementary components to an isotropic (random) finish. This improved surface increases energy/motion transfer efficiency in the metal-to-metal contact area by reducing friction and providing an additional number of engineering advantages.
Featured Content
Why Isotropic?
Grinding is the traditional final metal finishing operation performed on engineered metal-to-metal contact surfaces such as roller bearings and some gears. It results in a surface with a unidirectional pattern that corresponds to the direction of the final grinding operation.
Grinding with successively finer grinding wheels is expensive, repetitious and ineffective. It simply results in a surface that has more, closer-spaced rows of shorter height asperities. When placed into operation for the first time, ground components have a minimal area of initial metal-to-metal contact at asperity peaks where contact stress is concentrated.
Because asperities have been removed, parts that have been isotropically prepared have an improved metal-to-metal contact pattern. The final surface is smoother, and contact stress in any one location is diffused over a wider area due to the improved contact pattern.
Generating the Finish
The ISF process is a chemically accelerated vibratory mass finishing process which is patented worldwide. The process uses conventional vibratory finishing equipment and high-density, non-abrasive media to produce an isotropic superfinished surface. The use of mass finishing equipment permits processing of large batches of parts. ISF processing is capable of generating a surface finish with a 0.02 μm Ra. These isotropic superfinishes achieve the highest performance ratings in terms of friction, heat, noise and wear in the bearing, gear, and turbine industries. The process is proven and is currently in use in many different industries. It is especially successful on parts that operate in high contact loading, metal-to-metal applications.
During ISF, asperity refinement occurs in a chemically accelerated vibratory finishing process. Parts to be refined, such as automotive camshafts, valve springs, gears, bearings, and rings/pinions, are placed into a vibratory machine containing high-density, nonabrasive media.
The chemically accelerated vibratory finishing process consists of two steps conducted sequentially within the same vibratory machine. Initial refinement uses a cut chemistry which is added to the vibratory machine. The chemistry, which will not generate hydrogen embrittlement in high-strength steel parts, reacts with part surfaces to produce a soft conversion coating. As the parts rolls in the vibratory machine, the conversion coating is wiped from peaks by the weight of the non-abrasive, high-density ceramic media, exposing unreacted, underlying metal.
The peaks, being elevated, are wiped preferentially. Because the wiped coating was formed by reacting with the steel’s surface, coating removal results in a lowering of the peak. Recessed valleys between the peaks are untouched by the media, leaving the coating intact and the valleys untouched. The coating re-forms on lowered peaks to propagate final peak removal.
Once asperities are removed and the improved micro-finish has been achieved, a mildly alkaline, soap-like burnish chemistry is added to the vibratory machine to neutralize and remove any residual coating remaining on the parts from the refinement step. This yields a mirror-like final finish on hardened steel components
In high-volume production operations, cost savings are realized through the ability to process parts in mass, thereby, achieving the ISF finish at per piece costs lower than conventional grinding, honing and lapping operations.
Bearing Tests
As noted earlier, engineered metal-to-metal contact surfaces such as gears and bearings transfer energy by mechanical contact.
This contact can be a rolling, sliding or pushing force against a complementary component. Asperities on these surfaces introduce friction (inefficiency) into the mechanical transfer of energy, resulting in energy loss which can most noticeably be monitored as heat generation.
In a recent evaluation, a major bearing manufacturer monitored the performance features of two, functional metal-to-metal contact surfaces using an ASTM D 2714 and D 2792 Block-On-Ring test. The test rig holds a steel coupon under constant load against a rotating ring. The contact interface between the rotating ring and the loaded coupon then becomes an area of experimental interest.
Researchers sequentially evaluated a series of steel blocks and rings. During each evaluation, the oil sump temperature was monitored as the ring was rotated at a constant 800 rpm. The block was held on the rotating ring under a constant 1000-lb load.
In the first set of evaluations the steel coupons were finished using the bearing manufacturer’s traditional grinding process to generate a 25 μin (0.64μm) Ra surface finish. These samples served as the experimental control standards. In the second set of evaluations, the steel coupons were ISF-prepared to a finish of 2.3 μin (0.06 μm).
In the initial tests, mechanical abrading away of asperities on the ground surfaces correlated with a higher monitored bearing temperature. Additionally, there was a definitive temperature spike (165°F) associated with the completion of the loading phase of the break-in cycle on the ground test specimens. Once the metal-to-metal contact surfaces of the ground specimens were broken-in—that is, asperities were removed—monitored temperature dropped to a steady state operational temperature of 145°F.
When the testing was repeated using the ISF-finished specimens, there was no temperature spike. No asperity peaks were present; therefore, no break-in period was required. The ISF-finished specimens showed a gradual rise to a steady-state temperature of 132°F—a 13°F difference in final operating temperature compared with conventionally ground specimens. It can be inferred from this experiment that the reduction in operational temperature at the metal-to-metal contact interface indicates a reduction in metal-to-metal friction, thereby allowing this contact interface to retain energy that would ordinarily be lost to frictional heat generation.
A second bearing manufacturer evaluated bearing sets under various loading levels and confirmed the temperature reduction. Bearing sets evaluated consisted of roller bearings as well as inside and outside races. The evaluation was performed to determine the extent of the possible benefit achieved by ISF finishing when applied to complete or partial bearing sets.
The company chose for testing a common bearing set from its traditional line of roller bearings. Testing was performed using three sets of roller bearings sequentially mounted in a pillow block.
Test engineers varied the applied load on the bearing sets in the pillow block. Beginning at 1,000 lb applied load, loading was increased to a maximum of 10,000 lb applied load in 1,000-lb increments. In each evaluation the bearing sets were rotated at a constant 2,400 rpm; only the applied load was varied. The pillow block was equipped with a thermocouple to monitor frictional heat generation at the roller/cage interface.
Evaluation #1 served as a control standard, and consisted of the company’s normally ground roller bearings coupled with normally ground inner and outer races. In Evaluation #2, the rollers were ISF-finished prior to pairing with traditionally ground inner and outer races. Finally, in Evaluation #3, both the roller bearings and the races were ISF finished before testing.
At each loading level, the traditionally ground bearing sets consistently had the highest operational temperature. Bearing sets in which only the rollers were ISF finished demonstrated cooler operating temperatures at every loading level.
At load levels below 3,000 lb, the temperature differential was modest. However, as loading was increased from the 4,000-lb level, the temperature differential between the Evaluation #1 samples and the Evaluation #2 samples was significant. That differential was maintained throughout the balance of the loading variations. At all load levels, and most especially at the higher-end loading level of 10,000 lb, Evaluation #3 bearing sets demonstrated the most significant temperature reduction benefit.
Increased Durability
It is reasonable to expect that ISF to retain energy by reducing friction will also increase a component’s durability by reducing contact fatigue, asperity stress risers and metallic debris in the lube system. As an example, consider the operational mode of gear mesh. Gears, by their nature, undergo two primary modes of motion, rolling and sliding. Rolling motion consists of one gear tooth rolling upon its complementary partner during mesh.
Sliding motion occurs when the flank of a gear tooth slides against the opposing flank of another gear tooth during mesh. Sliding occurs both as gear teeth mesh and then again as they unmesh. Since sliding is a metal-to-metal contact action, it is here that ISF will benefit the gear by reducing contact fatigue problems.
In a recent evaluation, researchers used a rolling/sliding contact fatigue (R/SCF) Test Rig to evaluate this hypothesis. The test rig uses a crowned, 5-inch diameter loading roller and a 1-inch diameter specimen pin. During testing, the specimen pin is secured to a rotating motor shaft connected by two gears to the loading roller. The two components roll against one another at speed (rpm) selected by the test operator.
The tests produced a maximum 43% negative sliding ratio on the specimen; a sliding ratio in the mid-20% range is typical of normally paired gears. Adjusting the sliding ratio to an artificially high level facilitated failure of the specimen pin in a minimal test period.
Before testing, the test’s limitations and specimen performance were defined to determine test completion. Success was defined as cycle run-out at 5 million rotations of the pin without a failure, which was defined as specimen pin pitting. The test rig was equipped with a cycle counter to monitor rotation and a vibration monitor that would record the onset of pitting by the inception of specimen pin vibration and automatically shut down the test rig to preserve the cycle count.
Two types of sample sets were evaluated during the R/SCF tests. The first evaluations, performed on three sets of rollers and pins, provided a baseline, control standard and were prepared with a traditional ground/honed surface finish typical of the standard surface condition of gear tooth flanks as would be received from an OEM manufacturer.
In the first set of evaluations, using the control standard, traditionally prepared specimens, the operator was able to rapidly generate pitting failures on the pin specimens with the high applied sliding ratio. All three baseline standard samples failed in less than 5 million cycles at the lowest contact stress loading level of 400 ksi. In each case, the failure mode was by pitting.
A second set of evaluations was performed on two sets of ISF-finished rollers and pins. The ISF specimens could not be made to fail, even with the artificially high sliding ratio and successive applications of 400, 425 and 450-ksi contact stress loads. The initial ISF roller and pin set ran for a total accumulated cycle count of 62.4 million cycles. This included 20 million cycles at 400 ksi, 20 million cycles at 425 ksi and 22.4 million cycles at 450 ksi before the test rig was shut down for another test project. Testing on a second ISF specimen set produced similar results.
RELATED CONTENT
-
Drivers of Change
Is your metal finishing software ready for an upgrade?
-
Choosing Abrasive Compounds
Abrasive compounds for finishing a range of applications from prime automotive to painted cabinetry to composites.
-
Taking the (Oxide) Edge Off
Metal fabricators that laser-cut with oxygen take steps to prepare parts better for powder coating.


