Reading a Type II Dry Film Thickness Gage
Q: What should I look for when comparing gages? Testing and measurement expert Rob Weber from Fischer Technology provides this answer.
#measurement-testing
Q. I’m confused about Type II dry film thickness (DFT) gage specifications. Some manufacturers show an accuracy specification and some a trueness specification. Some show the gage repeatability, others do not. What is more
important: accuracy, repeatability or trueness? What should I look for when comparing gages?
A. That’s a very good question, because terms such as accuracy, precision, repeatability, trueness and so on are often misunderstood, interchanged or used incorrectly. Each of those criteria is important in understanding a gage’s true performance. When looking to compare different gage solutions it’s important to understand what those criteria mean.
Featured Content
ISO 5725-1:1994 is an excellent resource to gain additional information on this topic. This standard goes into great depth on the subject, but I will distill it here:
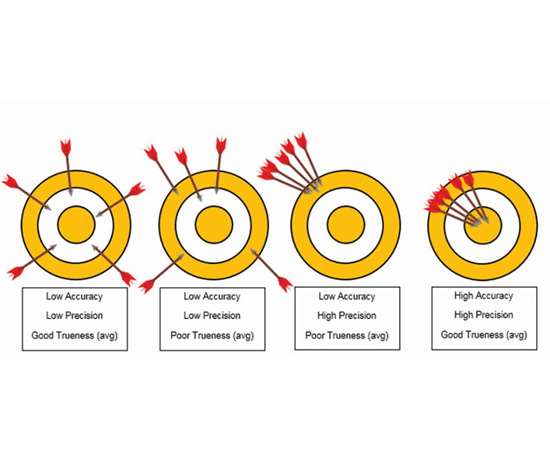
- Accuracy – the closeness of agreement between a test result and the accepted reference value.
- Precision – the closeness of agreement between independent test results obtained under stipulated conditions.
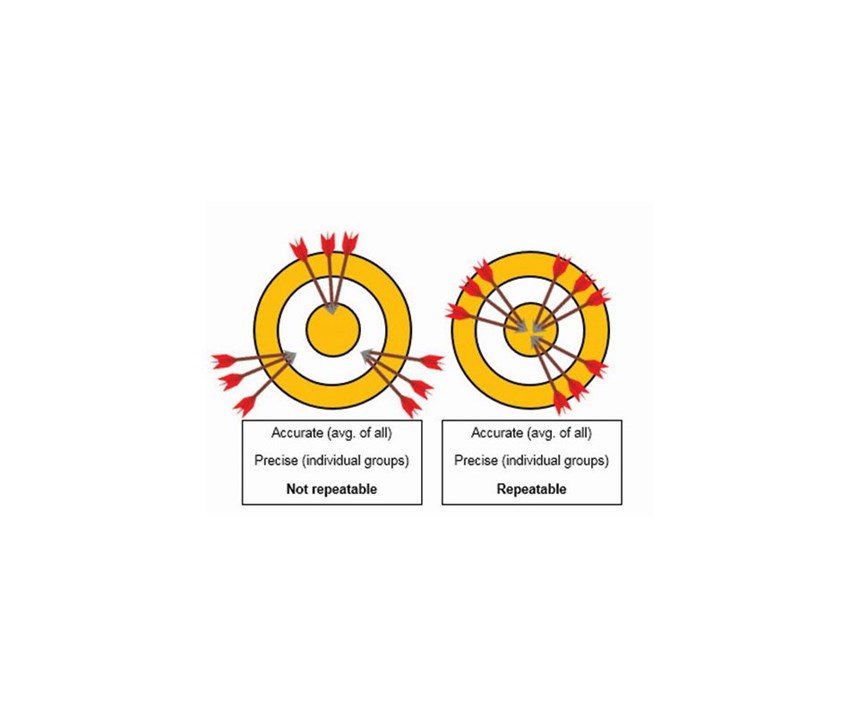
- Repeatability – precision under repeatability conditions, conditions where independent test results are obtained with the same method on identical test items in the same laboratory by the same operator using the same equipment within short intervals of time.
- Trueness – the closeness of agreement between the arithmetic mean of a large number of test results and the true or accepted reference value.
(Reference: ISO 5725-1:1994 Accuracy (trueness and precision) of measurement methods and results — Part 1: General principles and definitions)
In other words:
- Accuracy – how close a measurement is to the real (or accepted) value.
- Precision – how close together measurements are within a group.
- Repeatability – consistency between groups of measurements measured the same way, on the same part, by the same person.
- Trueness – the closeness of the average of a large number of measurements to the actual, or true, value.
Graphic analogies can be helpful to describe this visually. Something else to consider to ensure accurate measurement is the quality of the calibration standards used for field adjustment and gage verification. With DFT gages, you’ll often hear the terms calibration “foils” or “shims.” These are typically plastic, polymer or metallic standards labeled with thickness values.
It is important to consider the quality, or tolerance, of the calibration (adjustment) standards used with the gage. The tolerance of the standards needs to be included in the measurement value. In other words, the most capable gage available, calibrated and adjusted to standards with a tolerance of ±20 percent, can only be considered to be accurate to ±20 percent.
Where and how does this affect the user of a DFT gage? For example, a project theoretically requires 50 gallons of paint to meet a minimum dry film thickness of 5.0 mils. Using ±20 percent calibration standards, the contractor must apply the coating to a thickness of 6.0 mils to compensate for the standard’s tolerance and meet the specification’s minimum true thickness of 5.0 mils. Using standards with a ±5 percent tolerance enables the contractor to coat closer to the true required thickness, only needing to apply the coating to 5.25 mils to meet the 5.0 mil minimum thickness requirement.
| Gage A (using ±20% standards) |
Gage B (using ±5% standards) |
|
| Paint to a true thickness of 5.0 mil |
60 gallons (5.0 mil + 20%) |
53 gallons (5.0 mil + 5%) |
| Cost of paint | $4,500 | $3,975 |
| Savings from simply using better standards? $525 | ||
Another consideration for calibration standards is to look for not only the tolerances, but also for traceability of the standard. Is the calibration standard traceable to an accredited laboratory? Standards, traceable to a recognized organization, are helpful in demonstrating and proving a measurement device is working correctly and providing trustworthy readings.
The bottom line, or the moral, for this is story is to look beyond a simple “accuracy” specification and also look to a gage’s trueness and repeatability specifications as important criteria in comparing measurement systems. Another factor in measurement performance is the quality, tolerance and traceability of the corrective calibration standards used for gage adjustment.
About the Author
Robert Weber
Rob is an applications and product support engineer with Fischer Technology. Visit fischer-technology.com.
RELATED CONTENT
-
Corrosion Resistance Testing for Powder Coating
Salt spray can be useful to help compare different pretreatment methods and coatings but it does not tell us much about the corrosion resistance of a part over time in the field. Powder coating expert Rodger Talbert offers insights into how to get a better idea of how to improve a part’s corrosion resistance in the real world.
-
Test Methods For Evaluating Anodized Aluminum
Benefits of anodizing include durability, color stability, ease of maintenance, aesthetics, cost of initial finish and the fact that it is a safe and healthy process. Maximizing these benefits to produce a high–performance aluminum finish can be accomplished by incorporating test procedures in the manufacturing process.
-
NASF/AESF Foundation Research Project #121: Development of a Sustainability Metrics System and a Technical Solution Method for Sustainable Metal Finishing: 5th Quarterly Report
The NASF Research Board has funded a research grant at Wayne State University on sustainability in the surface finishing industry, under the direction of Professor Yinlun Huang. The objective of the work is to create a surface-finishing-specific sustainability metrics system to measure economic, environmental and social sustainability. In this report, he describes how such a tool can work to benefit our industry. The reader is invited to contact Dr. Huang in identifying plating shops willing to participate in this program; it is not too late.


