Try a Holistic Approach to Improve Anodizing Processes
Continuous improvements in quality and process efficiency are a must if your company is to compete in today’s market.
#economics
Continuous improvements in quality and process efficiency are a must if your company is to compete in today’s market. By making changes in the four areas discussed here—what I call the complete spectrum of control factors for the anodize tank—and using them together, you can begin to realize maximum anodizing efficiency and energy savings. The four areas are:
- Process tank control factors
- Power supply electronics
- Manual/auto control procedures
- Tank design factors.
We’ll also cover a new development that can further improve anodizing efficiency.
Featured Content
All information in this article is applicable for Type II-Sulfuric Anodize (Clear and Dyed), Type III-Hard Anodize and Type 23-Type II & III processed in same tank. It is based on my nearly 50 years of experience in the anodize industry.
Process Tank Control
A review of more than 75 major aerospace, military and commercial anodize specifications shows that many of the process parameter ranges given are simply too high for efficiency, too low for specific alloys, and too wide open for quality and energy savings. The ranges from these specifications are summarized in Table 1.
For maximum efficiency and energy savings, I recommend basic Type II free sulfuric acid concentration should be 10-11 vol.%. The Type III free acid concentration should be 11.0-15.5 vol.% for hard anodize. This range will also work for a universal Type 23 anodize tank. These ranges have yielded maximum energy savings for 2000-series aluminum alloys hard anodized at 14-15.5 vol.% free acid and for 7000-series alloys hard anodized at 11-13.0 vol.% free acid.
| Table 1. Recommended Anodize Tank Operating Ranges from Specifications | |
| Parameter |
Total Range |
| Free Sulfuric Acid |
5.0–(10.0–(11.0–13.5–15.5)–20.0 vol.% (18.3–20.1–28.4)% wt/vol. |
| Sodium Bisulfate |
3.0–7.0% wt/vol. |
| Additives |
2.0–5.0–7.5% (8.0-15.0% concentration; not needed with modifiers) |
| Modifiers |
1.0–2.0–3.5% |
| Temperature |
20–30–(40–55)–(70-85) >110°F |
| Aluminum |
3.8–10–20 g/liter max. |
| Air Agitation |
2.5–3.0–5.0 CFM /sq ft of solution surface |
| Current Density |
18–24–30–50–75 <125 asf |
|
Hard Anodize Rate |
1.0 mil…...10–20 min 2.0 mil…..20–35 min 3.0–5.0 mil/hr |
| Type II Anodize Rate CL–1 Clear |
0.2–0.4 mil…..10–15 min @ 20–24 v |
|
(Type – II – 23) CL–2 Dyed |
0.5–1.0 mil…..20–35 min @ 20–24 v |
| Type 23 | 1.5–2.0 mil..…30–50 min @ 20–24 v depending on alloy |
Higher acid concentrations (15-20 vol.%) produce softer coatings. Running alloys such as 2011 and 2024 at these high concentrations will require a good additive and/or modifier to maintain coating hardness. Additions of sodium bisulfate can result in time and energy savings when processing heavy salvage coatings using low-sulfuric-acid formulations (5-10 vol.%).
Correct use of additives and modifiers can significantly boost efficiency and energy savings. My first additive formulations and patent applications date back to 1962. The latest formulation, developed in 2004 and called Power Powder, is much more active and efficient early in the ramp cycle. Many other additives are not being used properly, in many cases due to low initial makeup and smaller than necessary additions.
Additives, modifiers and accelerators perform various functions: metal complexing of various alloy ions; aluminum complexing; and heat absorption in the pore structure. Heat is absorbed in the pore structure during aluminum oxide formation, which lowers resistance and dissolution and increases anodize efficiency and energy savings. Power Powder absorbs 100-250% more heat in the pore structure than any other material on the market.
Additives should be used at a concentration of 5-7.5% for maximum efficiency and energy savings. Properly used, additives and modifiers result in four major improvements:
- Initial anodize formation and better pore structure
- Brighter dyed coatings
- Improved final microfinish
- Lower final voltage and/or amperage.
Another important factor for efficiency and energy savings is process temperature. The industry started at 70°F and never changed. Type II anodize can be run at 85° F with higher efficiency and energy savings as long as a good additive and/or modifier is used. There are plants that have been in production for many years operating at 85°F to produce high-quality Type II anodize dyed with bright colors and good microfinish. Type III anodize can and should be operated at 40 to 75°F. It should never be run at 30-35°F, nor without additives.
I reiterate that a good additive and/or modifier must be used at a higher concentration for good heat absorption in the pore structure during the ramp cycle and initial anodize build up. Our company has customers hard anodizing at 75-85°F with 25-50% better efficiency and energy savings using a new modifier, which we are offering at cost on a trial basis.
Power Supply Electronics
Standard anodize rectifiers are full-wave and should have both constant-voltage (CV) and constant-current (CC) controls. Units with silicon-controlled rectifiers (SCRs) in the secondary are preferred and more efficient; secondary SCRs handle rectification and control simultaneously, giving a sharp turn on time and increasing efficiency during the ramping cycle. The voltage requirements for Type II and III rectifiers should be 24-30 V and 75-100 V, respectively.
| Recommended Pulse Specifications | |
| Duration |
10–30 sec |
| High pulse on time |
0.5–4.0 sec |
| High pulse off time |
0.5–4.0 sec |
| High pulse current |
10–50% above operating amps (during ramp period) |
| Low pulse on time |
0.5–4.0 sec |
| Low pulse off time |
Total high pulse/low pulse time cycle |
| Low pulse current |
25–50 % below operating current |
| Pulse step ramp on time (dwell) |
0.5–30 min |
| Pulse step ramp off time | Total high pulse time cycle |
Special secondary half-wave rectifiers can provide good efficiency and energy savings. Half-wave rectification works very well together with specific additive and modifier chemistry when processing alloys such as 2011 and 2024. However, half-wave rectifiers should not be used for chromic acid anodize. Use only full-wave rectification for chromic acid anodize.
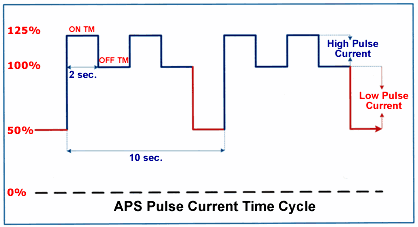
High-frequency pulse is applicable to only very high-current-density requirements. Slower, low-frequency pulse works better with energy savings of 20-25% or more on both Type II and III anodizing. Pulse parameters should be centered around slow (very-low-frequency) high and low pulse times to take advantage of both relaxation and recovery times.
Control Procedures
The control techniques reviewed here can result in high-quality anodized parts with maximum efficiency and energy savings when they are used as part of a total package.
We have already stated that very-high-frequency pulse systems do not give the best results. Lower frequency is most important during the ramp cycle. Pulse time must be slow (0.5-4 sec) to allow for recovery time and maximum current efficiency. The high pulse or current amplitude can be 10-50% of the amperage reading during the entire ramp cycle.
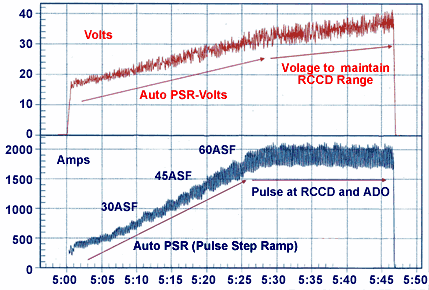
Pulse-step-ramp with the addition of steps or dwell periods has proven to be beneficial. The steps (dwell periods) will vary from 0.5 to 4.0 min depending on the alloy. Charts and specifications are available upon request for processing all wrought (2000-8000 series) alloys as well as for die-cast materials such as A380.
Total process ramp time is critical, as are starting and ending parameters at constant or final running current density. Type II sulfuric anodize should be ramped in the voltage mode over an approximate 10-min period to ensure better dye absorption along with maximum sealing capability.
I recommend raising voltage manually to 10-12 V, then auto-ramping over 10 min to 20-22 V. In 10-15 min, these approximate values will produce 0.2-0.5 mils of Type II anodize meeting the requirements of MIL-A-8625 F, Class-1 as well as most other specifications.
Here is a basic hard anodize pulse-ramp cycle, to and including constant current density (CCD):
- Load parts into anodize tank. Maintain low voltage (3 V) during loading.
- Manually increase to 10–12 V or 10 ASF (25% of running constant density, or RCD).
- Turn on/set auto controller 1.0 V/min, depending on alloy.
- Pulse-step-ramp to RCD.
- CCD to end of cycle.
CCD is a technique that is not being used or properly used by most anodize facilities. It is applicable for both Type II and III anodize, reducing process time by 25-50% in many cases. Recommended current density ranges resulting from in-process production tests and records are 18-24 ASF for Type II anodize and 30-50 ASF for Type III anodize.
For Type II anodize, use pulse-step-ramp to a predetermined voltage (16-22 V) where current density will be within the upper limits of the desired range (18-24 ASF) without measuring each part in the tank. When amperage drops off due to anodic coating formation, increase voltage to bring it back to RCD. Considerable quality and efficiency can be gained or lost here depending on whether or not CCD is used properly, as outlined below.
Anodizing should be run within a CCD range—not at one exact value or setpoint—so that current can drop off as the anodic coating builds up. Amperage drop-off (ADO) can be controlled for different alloys by setting current between two adjustable setpoints using a process controller or relay meter. When amperage drops to the low setpoint, it is increased by auto control to the CCD setpoint. This ADO principle should always be used in the CCD range. One obvious energy saving of this approach is reduced final voltage for hard anodizing.
I recommend that anodizers use real-time graphs of parts in process along with adjustable amperage checkpoints on the graph. Various data loggers are available with real-time graphing capability, and they allow the operator to observe and check production jobs through the complete voltage/amperage/temperature process cycle.
Recent testing has proved the value of real-time graphic data logging in certain areas which can represent an extremely fast payback. Some of the benefits include:
- Continuous (24-hr) logging of production loads
- Efficiency monitoring of every tank load
- Accurate permanent records (graphs) on all special jobs
- Quality improvements with reference to past graphic records
- Improved quality and repeatability.
Tank Design Factors
In this section I will note only some basic problems and maintenance checkpoints, because most qualified anodizers should be very familiar with tank design factors that can impact anodize efficiency and quality.
Bus bars must be sized properly, have plenty of good flat contact area between joints, and be assembled using good practice. Contact between rack and work bus bar should be flat and tightly clamped.
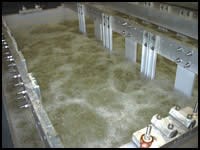
For agitation, air and/or a combination of air and pumping have proven to be most successful overall, and proper air agitation improves the efficiency of some additives. Unfortunately, I would estimate that 75% of all such systems I have reviewed need modifications to produce maximum efficiency and energy savings.
Air volume to the agitation lines should be 3-5 cfm for each square foot of anodize solution surface. Efficiency improvement with proper air agitation is in the form of faster ADO during the anodize cycle, which indicates a faster coating rate.
Here are more design recommendations, which should provide good air agitation in tanks up to 10 ft long. First, never use regular air compressors. Use a high-volume, low-pressure air regenerative blower to supply air to a manifold which feeds riser pipes in all four corners of the tank. Air line holes should be 0.020-0.040 in diameter, drilled horizontally one inch apart on both sides of the line, and lines should be spaced 6–10 in apart for the length of the tank. A good wetting agent helps initiate micro-bubble formation. Lignin sulfonate products such as Orzan work quite well and also increase additive and modifier efficiency.
A third element of proper tank design is use of aluminum cathodes. Unless an electrical charge is maintained on the cathodes when the tank is not in operation, I suggest alloy 6063 T-6 cathodes to avoid dissolution problems. Cathodes designed for better throwing power are also available.
The often-suggested cathode:anode area ratio of 1:3 can be raised to 1:1 when coupled with a good additive and modifier system. Cathodes should be spaced evenly along the length of the tank on both sides for even current distribution.
New Technology
To conclude, I would like to mention a new technology that increases anodize current flow at lower voltage in the beginning and throughout the ramp cycle. Our company has developed and put into production a new capacitance shunt discharge (CSD) system that is more economical and practical than previous models because its use is limited to the pulse-ramp cycle.
The system works by discharging capacitance reactance (impedance) on the anodize tank, resulting in a higher amperage at the same low voltage. It has been used successfully with both half- and full-wave secondary SCR rectifiers, and can increase current density from 40-150% between 5 and 20 V depending on the system.
RELATED CONTENT
-
How to Apply the 720 Rule to Current Density Anodizing
What can you tell me about the 720 Rule as it applies to current density anodizing? Plating expert Sjon Westre, Ph.D., from Chemeon, answers this question.
-
Deoxidizing Aluminum as a Pretreatment
This important first step can help prepare the metal for subsequent surface finishing.
-
Plating Q&A: Can you color stainless steel?
Our expert, Art Kushner, says yes, you can color stainless steel, but it is not a process that is typically performed in a plating shop. Read more about his answer.


