Published
Turbo-Charged Abrasive Machining Offers Uniformity, Consistency
Method can deburr, produce edge contour effects rapidly
Michael Massarsky, President, Turbo-Finish Corp
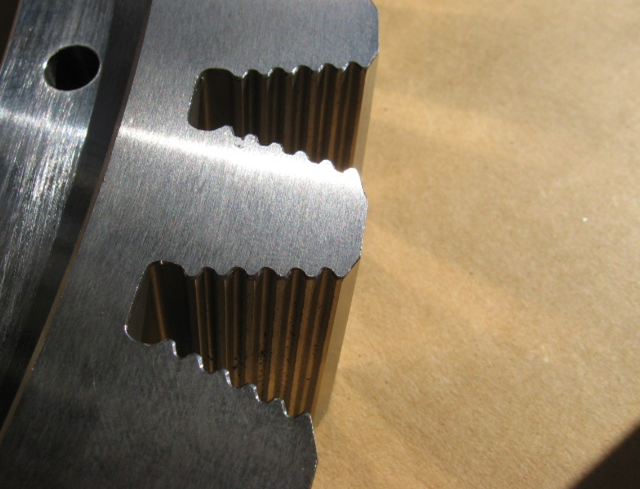
Turbo-finishing—or turbo-abrasive machining—is a loose, abrasive machining method that can deburr and produce edge contour effects very rapidly. The method is especially useful for the final machining and finishing of larger complex rotating components. These types of parts often are not good candidates for other mass media finishing techniques and until now have required very tedious and expensive manual deburring.
The turbo-abrasive machining (TAM) process can automate much of this work, not only reducing labor and costs, but improving the uniformity and consistency of edge and surface effects in a way not possible to duplicate with single-point-of-contact machining methods.
This uniformity and the isotropic nature of the edges and surfaces that are developed can also markedly improve the surface integrity and fatigue resistance of many types of critical components.
Turbo-Finish Parameters
There a number of processing parameters that will contribute to the results on a given part, and are controllable and repeatable with a programmable process control technology. These parameters include:
- Part rotational speed
- Part positioning (including distance from or depth of fluidized bed envelopment)
- Time cycle of rotation and counter-rotation
- Abrasive grain velocity within fluidized bed
- Abrasive grain size
- Abrasive grain composition and pretreatment
TAM technology has several advantages over other mechanical finishing processes, such as a high flow of free abrasive grain that allows for penetration of abrasive media particles into difficult to access part areas that require edge and surface finish improvement. Another advantage is lower energy consumption, especially in contrast to pressure-blast surface finishing. It also has very simple tooling, processing and maintenance requirements.
The combination of rapid deburring and high rates of metal removal can mean a significant improvement in the physical and mechanical properties of metal surfaces that can enhance surface integrity. These changes include developing residual compressive stress, surface isotropicization, surface profile skewness correction, contact rigidity and load-bearing ratio improvements.
The TAM technology has been demonstrated to successfully impart compressive stresses into parts in a fashion that is, in some ways, superior to shot peening. The method also is capable of producing surface conditions at these critical edge areas that contribute to increased service life and functionality of parts that are severely stressed in service. This includes the creation of isotropic surfaces and the replacement of positively skewed surface profiles with negative or neutral skews. It also includes the development of beneficial compressive stress and the creation of an overall stress equilibrium in parts with a complex feature set.
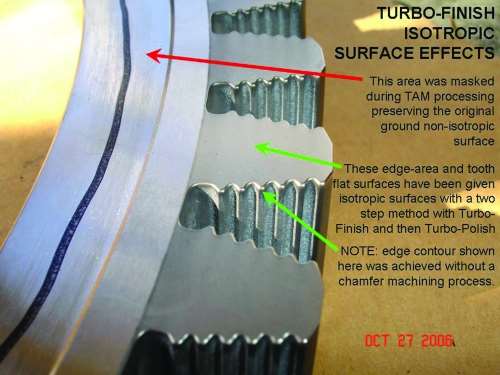
To elaborate, the linear characteristics of ground or machined surface patterns can be modified into one in which surface tracks developed by abrasive action have a random (isotropic) non-linear nature, minimizing potential crack propagation points.
The basic character of the surface profile also can be changed from one having a positive skew in which surface peaks were the predominant surface feature to a neutral or negatively skewed surface. These types of plateaued surfaces have much higher bearing-load ratios than their positively skewed counterparts, and can increase the service life of components or tools in high-wear situations dramatically.
This characteristic—along with surface isotropicity—can improve contact rigidity of mating surfaces, improving seal contact and broadening the surface area of mating surfaces generally. These types of surfaces often display improved lubricant retention properties, as well.
Almost all common machining and manual finishing methods produce uneven stress hot spots in machined parts. This occurs because of the rapid rise and fall of temperature on metal surfaces at the tool or wheel point of contact.
TAM not only produces beneficial compressive stresses, but in many cases where all surfaces and features are affected identically and simultaneously also can promote a stress equilibrium or uniformity throughout the entire part. Thus TAM could be looked at as a corrective after-process for critical parts that suffer from these machining-related surface integrity issues.
The synergy involved in developing these kinds of effects can add potential value to service life, performance and functionality of parts that far exceeds the value of the improvements to fit, function and aesthetics commonly associated with other mechanical or mass finishing processes.
The technology currently is used in the United States to deburr and contour the edges of complex parts, and to create isotropic surface finishes essential in finishing many complex parts. Unlike single-point-of contact machining technologies, the technology is relatively simple to control once process parameters for a given part have been developed, and thus shares the attributes of reliability and repeatability of simpler mechanical (versus digital feedback) technologies. However, it accomplishes uniform results on very complex parts that often cannot be achieved reliably by other, much more complex processes.
The technology involves developing a fluidized bed of media in which the part to be processed is partially immersed while being rotated. A wide variety of differing results may be achieved by varying the process parameters (media, process time, rotational speed, etc.).
Process results can be closely controlled, are programmable and are totally repeatable, providing unequaled process quality control. The process is dry, and involves no chemicals or environmentally unfriendly materials.
TAM Process Elements
TAM technology depends on utilizing relatively small, free abrasive grains to access intricate part shapes. Unlike blasting or other impact metal finishing methods, the mechanism behind TAM processes uses a combination of kinematic forces to produce unique and distinctive edge and surface finishes on complex and intricate parts that cannot be processed with other automated deburring or finishing methods and usually are processed with manual deburring techniques. These two forces act synergistically and are mutually dependent. They consist of enveloping the part with abrasive grain suspended in a fluidized bed, and interfacing part edges and surfaces with abrasive grain by rotational motion of the part.
Although the abrasive materials used for TAM processing are in some ways similar to grinding and blasting materials, the surface condition produced is unique. One reason for this is the multidirectional and rolling nature of abrasive particle contact with part surfaces. These surfaces are characterized by a homogenous, finely blended abrasive pattern developed by the non-perpendicular nature of abrasive attack.
There is no perceptible temperature shift in the contact area, and the finely textured, random (isotropic) abrasive pattern is a highly attractive substrate for subsequent coating operations.
Component Service Life Improvement
Although TAM is primarily used as an automated method for deburring and developing edge contour, very important service life attributes also can be achieved, as the chart on page 26 shows.
By using this spindle-oriented deburr and finish method, it is possible to produce compressive stresses in the range of 300 to 600 MPa that form to a surface layer of metal to a depth of 20-40 μm.
Spin pit tests on turbine disk components processed with the method showed an improved cycle life of 13,090 ±450 cycles when compared with the test results for conventionally hand-deburred disks of 5,685 ±335 cycles, a potential service life increase of 2–2.25 times, while reducing the dispersion range of cycles at which actual failure occurred.
Vibratory tests on steel test coupons were also performed to determine improvements in metal fatigue resistance. The plate specimens were tested with vibratory amplitude of 0.52 mm and load stress of 90 MPa. The destruction of specimens that had surface finishes developed by the TAQM method took place after (3 - 3.75)*104 cycles, a significant improvement over tests performed on conventionally ground plates that started to fail after (1.1- 1.5)*104 cycles.n
Dr. Michael Massarsky is president of Turbo-Finish Corp. He can be reached at 917-518-8205, or Michael@Turbofinish.com. David Davidson is with the Society of Manufacturing Engineers, Deburr/Finish Tech Group, and can be reached at 509-230-6821 or dryfinish@gmail.com.
RELATED CONTENT
-
Glass Bead Blasting as Plating Pretreatment
What are the best practices for using blasting in preparation for plating? Angelo Magrone of Bales Metal Surface Solutions discusses the ins and outs of glass bead blasting.
-
How to Select the Right Flap Disc
Consider these five variables to determine what fits your application.
-
What’s in a Burr?
An unclear definition has led to an industry standard for classifying burrs.


