When Manufacturers Should Use 3D Measurement for Surface Finishing
Appears in Print as: 'More Than Just a Line'
Two-dimensional (2D) surface profiling systems are the standard for quality assurance in manufacturing, but some applications demand 3D measurement systems.
#ask the expert
Two-dimensional surface profiling systems are excellent for measuring surface finish under certain conditions, but three-dimensional measurement systems offer more robust data.
Photo Credit: George Schuetz
“In the beginning,” as some might say, an experienced machinist would use a scratch pad and an educated fingernail to determine the surface quality of a part. Then, in the 1940s, the first series of electronic surface finish gages were developed. Today, machinists and quality labs have surface finish standards and parameters and a variety of gages to measure surfaces.
There are two basic varieties of surface finish gage: skid-type, or averaging systems and skidless, or profiling systems. Skidded gages have a hinged probe assembly, with the probe riding next to a relatively broad skid that also contacts the workpiece. The skid tends to filter out waviness, so the probe measures only short-wavelength variations. A skidded gage usually has a dial or LCD readout to display the measurement as a single numerical value.
Featured Content
Skidless gages use a precision internal surface as a reference, so the probe can respond to waviness as well as roughness. To allow separate analysis of long- and short-wavelength variations, skidless gages usually generate a chart, on paper or on a computer screen, rather than a single numerical result.
Both methods are two-dimensional (2D) surface profiling systems. A profile system is an excellent and efficient way to measure surface finish under certain conditions. The first is that the probes must have the ability to be placed perpendicularly to the surface being measured. Then, the surface must be long enough to meet the requirements for a reliable and meaningful analysis. And finally, the surface and the process used to produce it are accessible using standardized surface and profiling parameters.
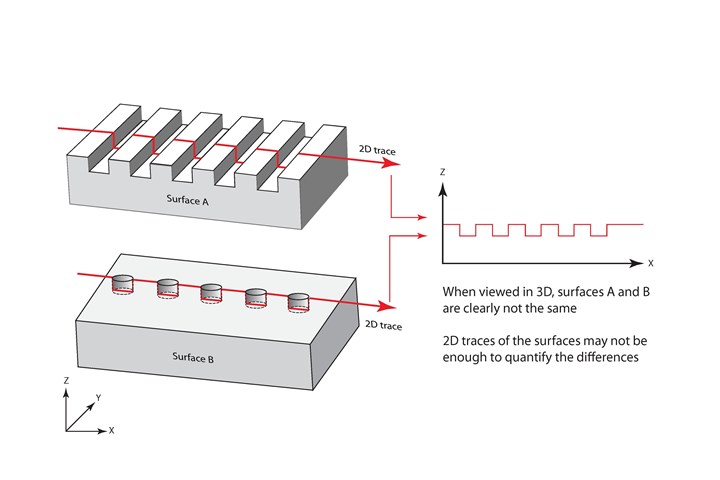
For decades, the 2D method served the industry well. However today, many new manufacturing processes can produce engineered surfaces that are non-uniform and whose properties are not the same when tested in different directions. Or they may have specific, complex structures or properties, or very small and difficult-to-access areas that require measurement. For these reasons, three-dimensional (3D) measurement data allow for more sophisticated parameter analysis.
These surface analysis techniques are being provided by optical technologies using vision, confocal image analysis and interferometry. Three-dimensional measurements using these methods are useful in applications that require concentration on functional structures, such as protrusions or depressions and the load-bearing ability of the surface. Three-dimensional measuring should also be considered for nontraditionally produced surfaces, as seen in ceramics and cast materials, or where nondestructive, material-independent surface quantification is needed.
In these cases, a 3D measurement is used to provide more in-depth information about the structure/characteristics of a particular surface. Instead of taking line measurements (in 2D), high-resolution optical surface metrology systems are used to capture a 3D image of the surface. This creates a topography map that includes highly detailed information about height and intensity and enables the operator to obtain a true representation of complex features. Three-dimensional measurement systems also provide more data for analysis, even offering micron and nanometer resolution surface finish and micro-geometry information, including 2D and 3D surface roughness, bearing area, flatness, depth, volume and much more.
In many industries and processes, the “standard” 2D contact analysis is still the go-to method for quick surface finish validation of well-understood products and processes. However, 3D measurement, with its powerful processing capabilities, may be the better choice when the surface is technically complex, requires additional statistical certainty or is composed of material that demands noncontact methods.
As manufacturing processes evolve and generate increasingly complex surfaces, understanding the benefits of 2D and 3D surface measurement technology is increasingly important. Calling in experts to help determine which technology is best suited for a specific needs may help ensure new processes meet their design goals.
George Schuetz
RELATED CONTENT
-
NASF's SUR/FIN 2023: Bringing the Surface Finishing Industry Together
SUR/FIN 2023 is an opportunity for those in the surface finishing industry to expand their knowledge, expertise and network.
-
Full Service Powder Coating
Snapshots of the surface finishing industry.
-
Finishing Another Year — Looking Back at the Trends of 2023
Products Finishing reflects on a year of reporting on the surface finishing industry and looks ahead to what may be in store for 2024.


