Measuring Electrocoat Film Build Is a Top Priority
Appearance and durability are affected if a coating’s thickness is greater than specified.
Film-build control and measurement is critical in a coating shop. If the coating film build on a product is less than specified, appearance and durability could be affected. Color position and smoothness are dependent on a coating’s thickness, and durability, adhesion, corrosion and chip resistance are reduced when the coating thickness is below specification. If the coating thickness is greater than specified, however, the shop essentially is giving away paint.
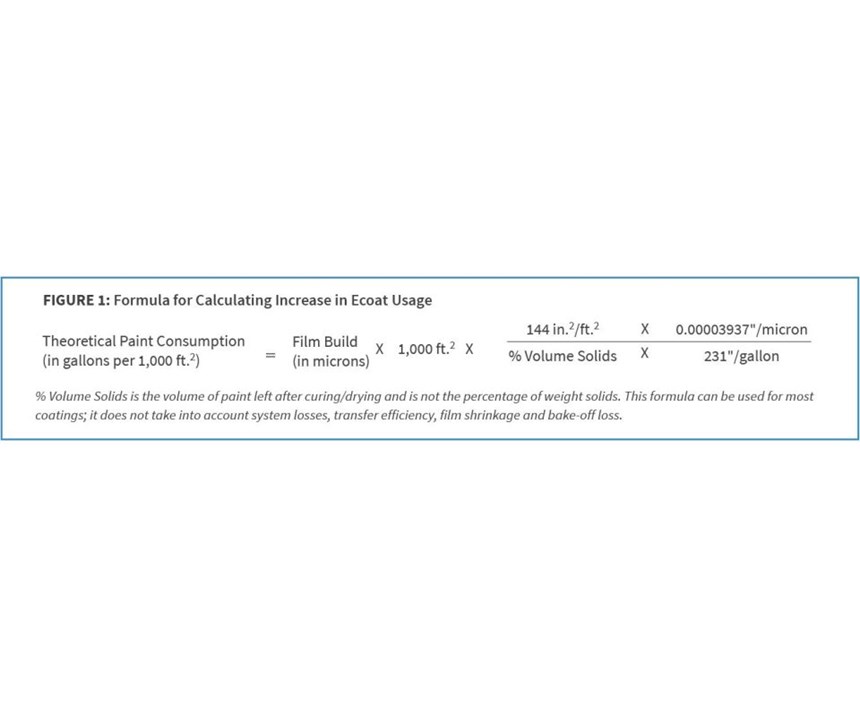
And while coating thickness is not the only factor that can affect appearance and durability, it is an important factor, and even small increases in film build over specification can have a significant impact on cost. If a coater is applying 2.5 microns (0.1 mils) more of electrocoat than the specified 15.25 microns (0.6 mils) on a part, the increase in usage would be approximately 14 percent. Figure 1 shows the formula used to calculate the increase in ecoat usage with a volume of solids of 33 percent.
Featured Content
Since film build is critical to the quality of product a coating shop produces and its cost, accurately measuring film build should be a top priority. Yet addressing this priority is easier said than done.
There are two basic ways to measure film build: destructive and non-destructive testing.
A destructive film-build test usually involves cutting the part or coating, and then optically or mechanically measuring the film build. This type of test is usually more accurate, but it generally is not practical for the coating shop.
The non-destructive test does not damage the coating or substrate, however, and is easy to use in a coating shop. Non-destructive film-build measurements usually employ magnetic, magnetic-induction or eddy-current thickness measurement methods. Gages that use magnetic and magnetic-induction measurement methods generally are used on non-magnetic coatings over a ferrous steel substrate. Gages that use the eddy-current measurement methods typically are used on non-conductive coatings over non-ferrous metal substrates such as aluminum. The accuracy of non-destructive film-build measurements depends on the gage and the gage operator.
Getting Accurate Readings
Generally, the cost of a film-build gage mirrors the accuracy of the gage. The more expensive a gage, the better its accuracy. However, if the operator is not skilled or knowledgeable about the instrument and about film-build measurement, the accuracy obtainable with the gage can be greatly reduced. Substrate variations and gage calibration also can have an effect on the accuracy of measurements.
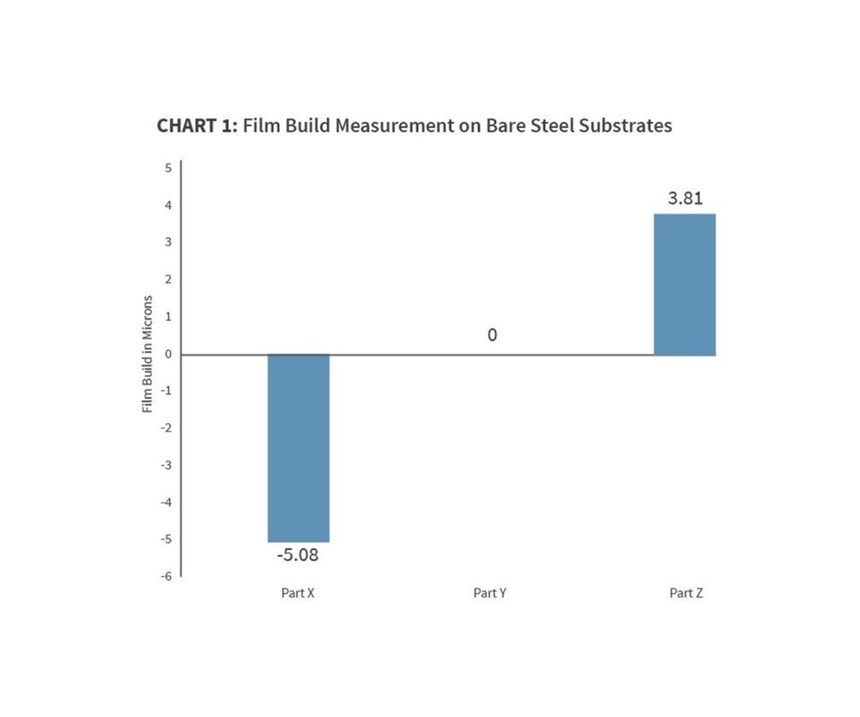
The magnetic properties of steel alloys vary according to the type of steel, and this variation also affects the film-build measurement. This effect is illustrated in Chart 1, which shows steel substrates without coatings. The gage was calibrated using substrate and thickness shims that came with it. If the variations in the substrates are not considered and the gage is calibrated to one type of substrate and then used to measure other types of substrates, the film build of the ecoat and topcoat layers will be inaccurate.
Chart 1 is interesting in that, although there is no coating on any of the steel parts, the gage’s film-build reading is not zero for Parts X and Z. This brings up the question of whether base readings should be added or subtracted from the final readings. If the base steel’s film-build measurement is negative, should that reading be subtracted from the final reading, thus producing a higher final film-build measurement? When the base film-build reading is positive, should it be subtracted from the final reading, which would reduce the final film-build measurement? To answer these questions and demonstrate the effect calibration has on film-build readings, the following experiment was performed:
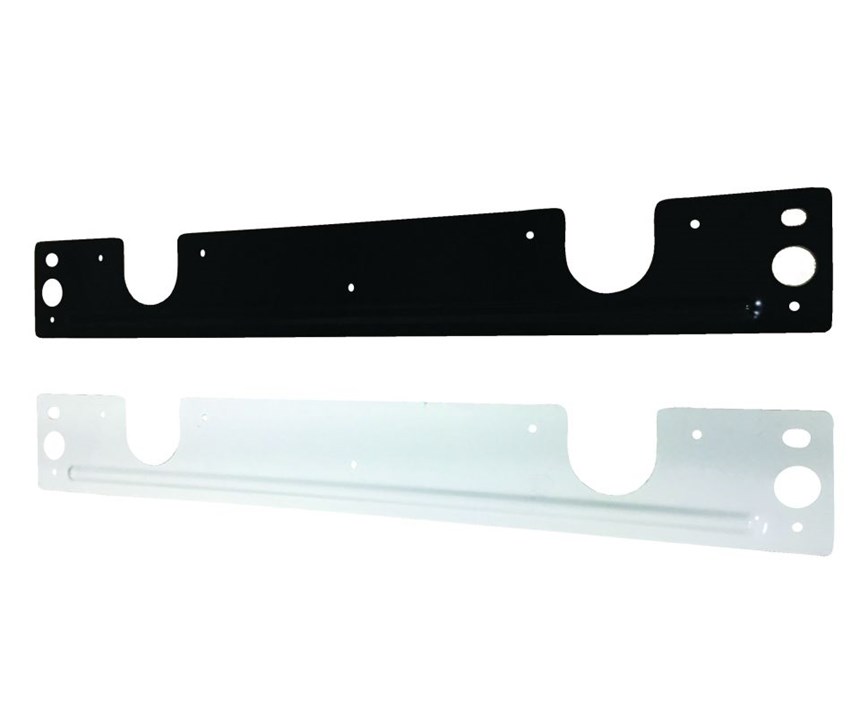
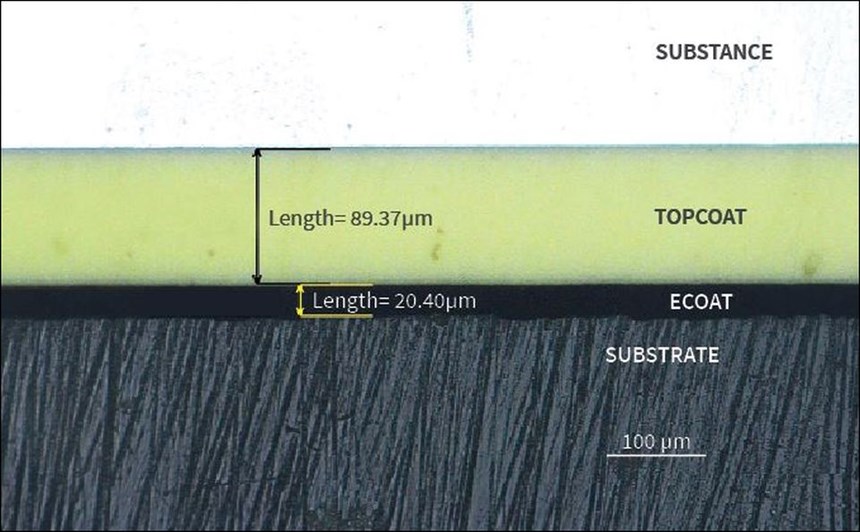
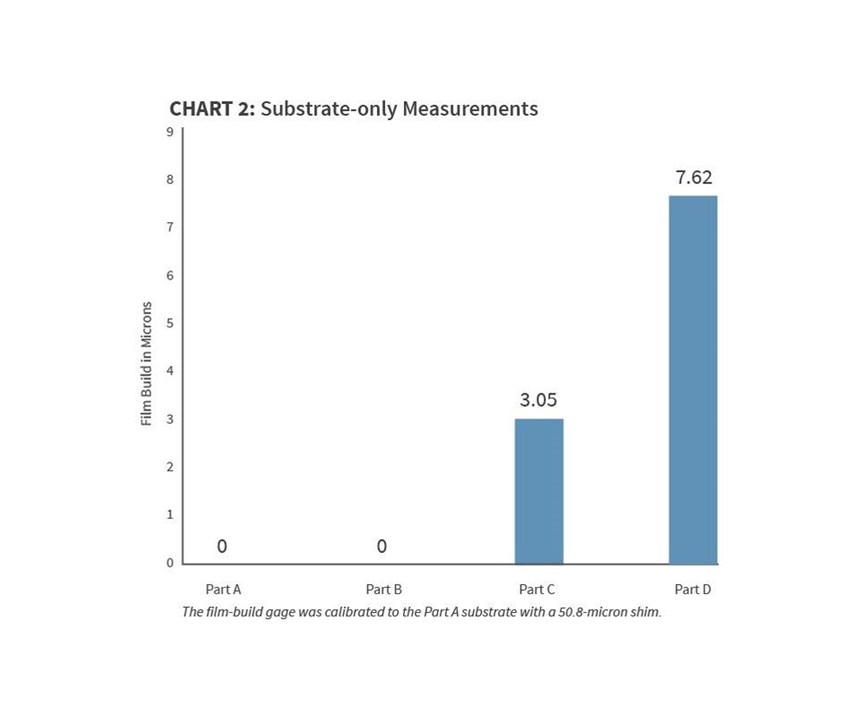
Parts, A, B, C and D were ecoated. Part A was steel flat stock with a stamped indentation that was both ecoated and topcoated (see Image 1). Part B was steel flat stock similar to part A that was stamped into a “U” shape. Parts C and D were cast steel. The bare substrates and ecoat were measured using a film-build gage calibrated to the Part A substrate with a 50.8-micron shim. (Part A represents a major part run in a particular shop, and the film-build gage in this shop would be set up for this part. The 50.8-micron shim would be in the middle of the required coating thickness.) Part A’s basecoat, ecoat and topcoat were measured after using three different substrates to calibrate the film-build gage. These substrates used for calibration were a steel panel, the substrate from the film-build gage itself and Part A’s substrate. All the parts were cross-sectioned, and the film builds were measured using optical microscopy. The cross-section microscopy for Part A are illustrated in Image 2.
The type of film-build gage used for the measurements in this experiment was a medium-priced, hand-held gage like ones that are commonly found in coating shops. Different manufacturers make hand-held gages, and testing results can vary by gage and by manufacture.
Calibrating Measurements
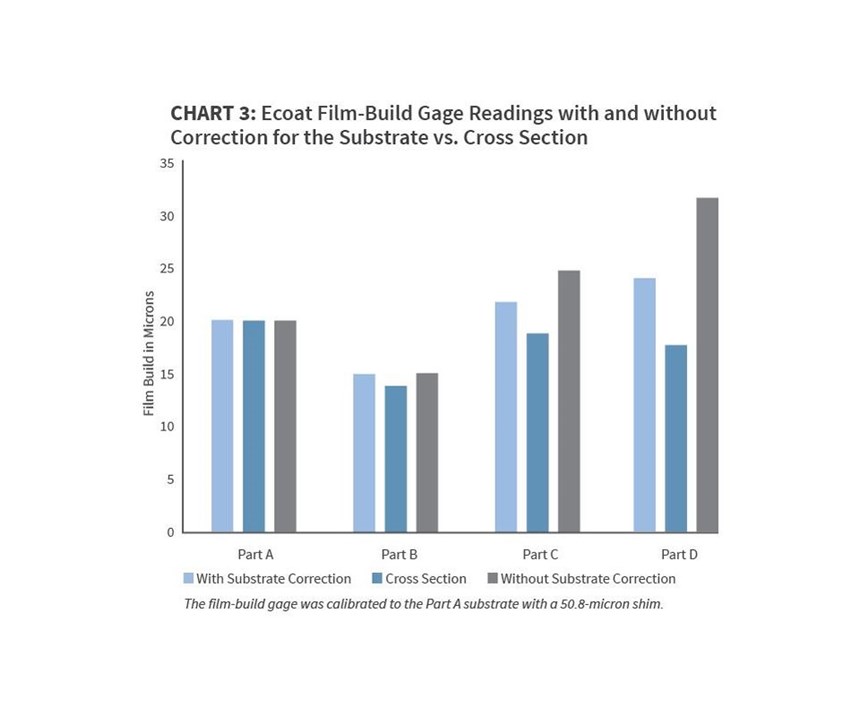
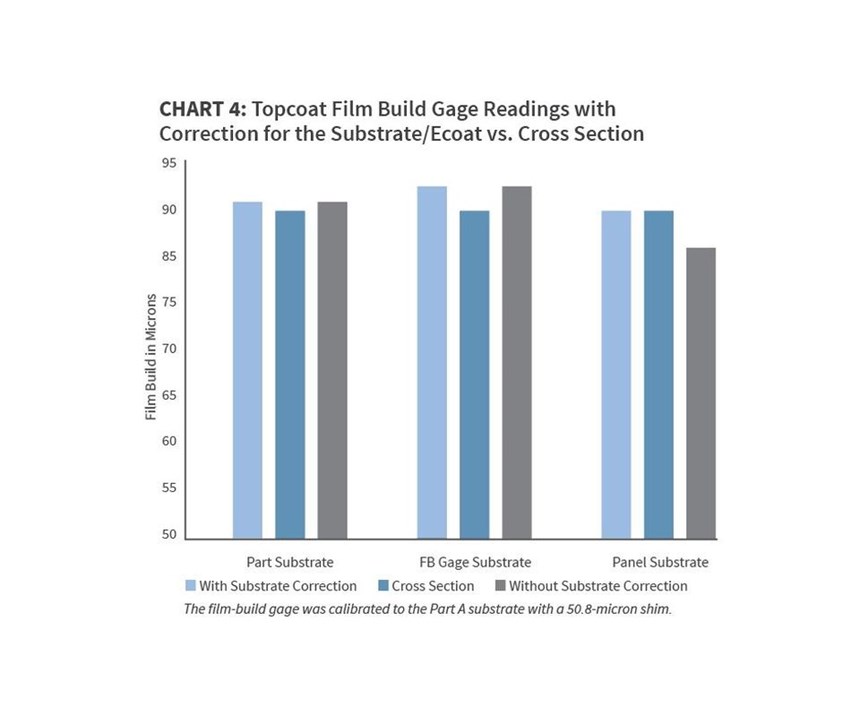
The substrate-only measurements for the parts are illustrated in Chart 2, and the ecoat film builds with and without substrate correction are illustrated in Chart 3. This shows that calibrating to the substrate is the best way to ensure that the film-build measurement for that particular substrate is correct. In addition, Chart 3 illustrates that correcting for the bare substrate reading is not always accurate. The topcoat film builds with and without substrate/ecoat correction are illustrated in Chart 4. These measurements, made with the gage calibrated to the part substrate, are not exact, but the margin of error is less than 1 percent. The readings made after the gage was calibrated to its own substrate were 3-percent off. The readings after the gage was calibrated to a panel were interesting: They were exact with substrate correction and 5-percent off without substrate correction.
The results of this experiment show that the best method for ensuring accuracy of film-build measurements is to calibrate the film-build gage to the substrate that is to be measured. In addition, this experiment illustrates that correcting for the substrate is not always more accurate. To ensure accuracy of film-build measurements it is best to verify the film-build gage and calibration method by mechanical or optical means.
For more information visit Axalta Coating Systems.
RELATED CONTENT
-
Salt Spray Vs. Cyclic Corrosion Tests
Joseph Subda, ecoat specialist for Axalta Coating Systems, explains the difference between these two corrosion resistance tests.
-
Wireless Carrier Fleet Provides Modular Overhead Conveyance
Wireless, modular conveyor system provides flexibility and scalability for carrying parts through finishing processes.
-
Conveyors and Paint Systems
Choosing the right conveyor system, coating technology, and ancillary equipment.


